


Photography Basics for Beginners Should Be As Easy As 5-Year-Olds Learning 1 + 1
A shiny new camera may stop you from learning quickly

Greetings Adventure and Travel Photographers!
Summer is here, and questions about which camera to buy for vacation are pouring in.
I love these questions because they allow me to help you in the best way possible.
As badly as I want you to go all-in with a shiny new toy, I'll talk you out of it first. Trust me. You'll know exactly why once you get through this newsletter.
But if you’re dead set on getting a new camera, practice using it often before going away, i.e., practice a lot.
A new camera with all its bells and whistles is a fantastic tool for creating stunning photos if you’re willing to put in the hours to use it properly.
The best way to start is to read the owner's manual.
I get it. You’re that person who attends YouTube University. I love YouTube and selectively watch videos appropriate to my skill level. But I guarantee you’ll end up overwhelmed with photography jargon that won’t help you as a beginner.
Think of it like learning how to dance for the first time.
Without enough practice, your feet fumble with awkward clumsiness once the music starts playing. This happens because it’s not “second nature” yet. With more practice, you start to dance with confidence and may even find yourself improvising.
You know you’re comfortable with basic photography skills when you start improvising with your camera.
Before we can get comfortable with our cameras, we must learn the basics, and the path of least resistance to achieving this is with your phone.
Unless you’re walking around with a camera slung around your shoulders every day, all day long, you have a better chance of improving your skills faster with a phone.
I’ll show you a few photos taken with a Samsung Galaxy 22+ and edited using the Photoshop Lightroom mobile app.
Visuals are a great way to learn simple concepts (like learning 1 apple + 1 apple = 2 apples).
Students have taught me how to share basic photography in fun and unintimidating ways.
When I first learned photography, I was a sixteen-year-old high school kid with a lot of time on my hands. My first film camera was a Nikon F, and I developed darkroom photos in school and my bathroom. After two years of classes and another two years of fine arts in my mid-twenties, I discovered my style and “voice” in photo storytelling.
Without having to go through years of classroom learning, you’ll immediately know how to create better photo stories with your phone with these three basic photography skills:
Composition
Practice
Editing
Basic Skill #1: Composition
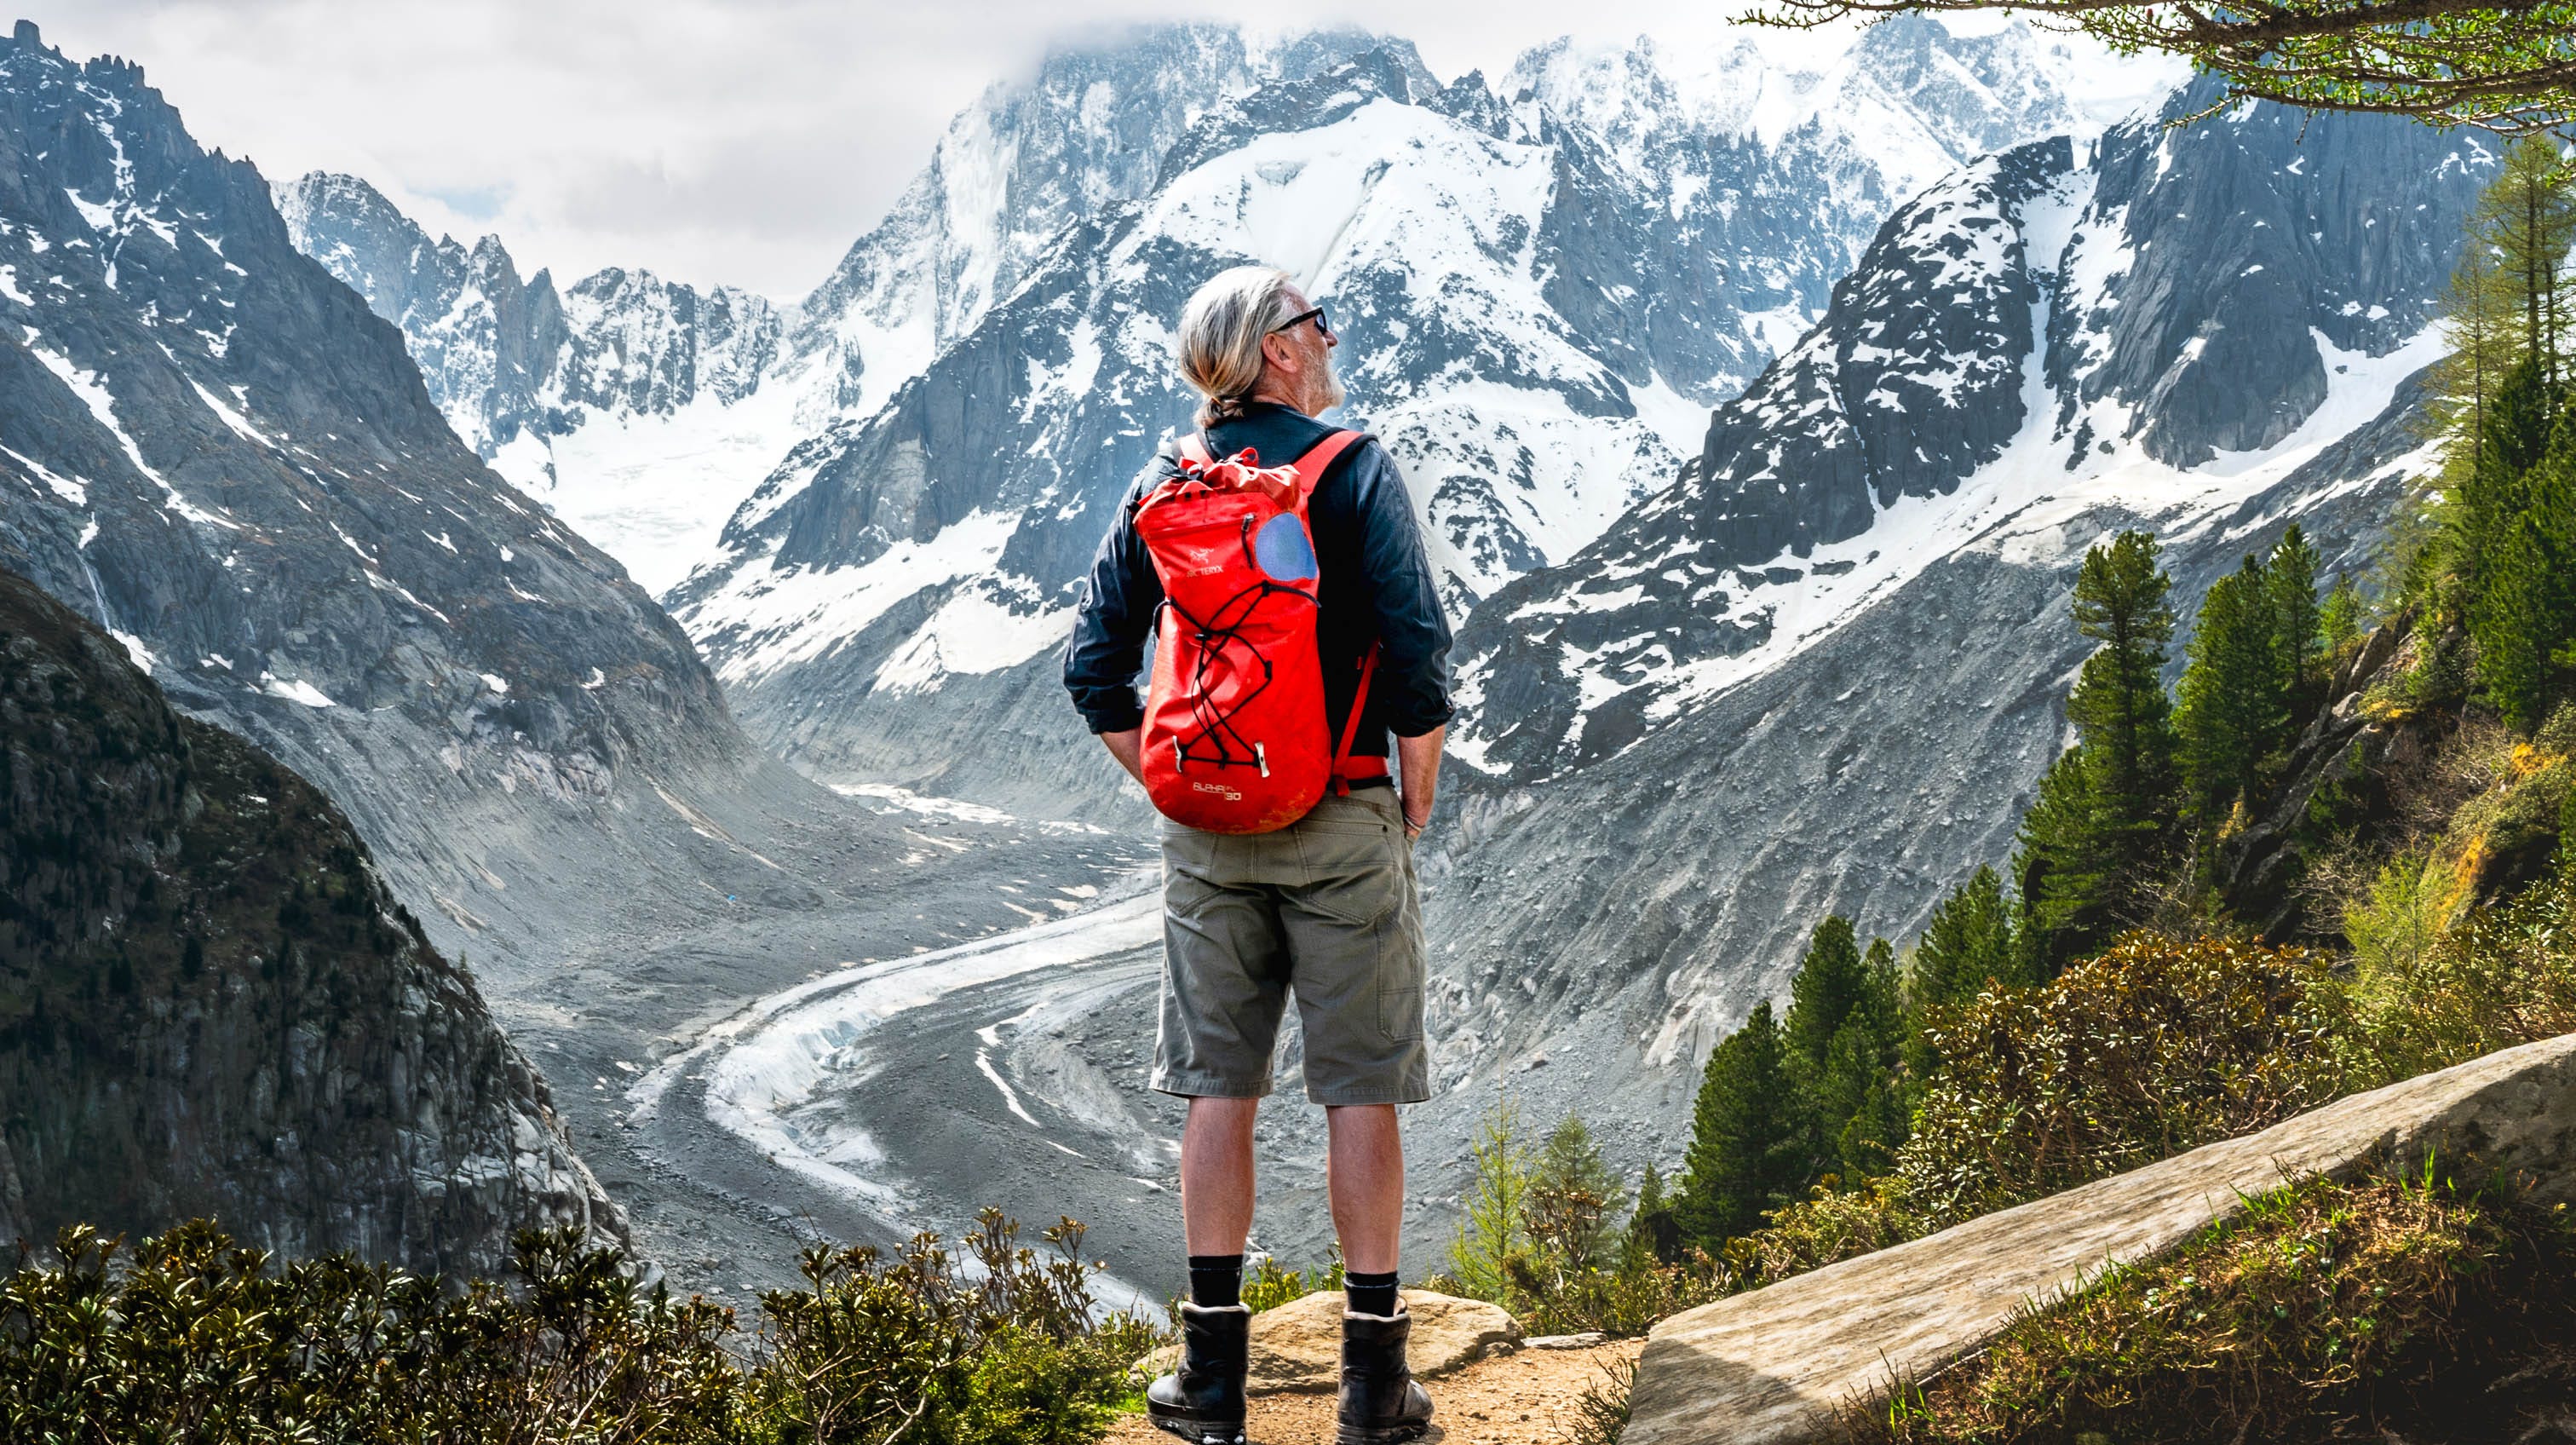
Take a look at this photo.
Imagine that it has a physical frame around it.

When the photo is in a frame, you pay attention to the parts that grab your attention.
Now imagine this photo without a frame.
Next, imagine unfolding the rest of the photo tucked behind the frame to reveal a much bigger picture.
Grab the frame and place it on top of a random area of the bigger picture.
Step back and imagine how this looks.
What do you see?
How does the photo within the frame make you feel?
Does it tell a story?
Now, let’s take the same photo and place it in a different frame: Portrait-Oriented (Vertical)

Which one is more pleasing to the eye?
Which one tells a better story?
When you take a photo or edit it, your first thoughts should be:
Will it share a story with the audience that evokes emotions?
Will it fall flat and end up confusing or boring the audience?
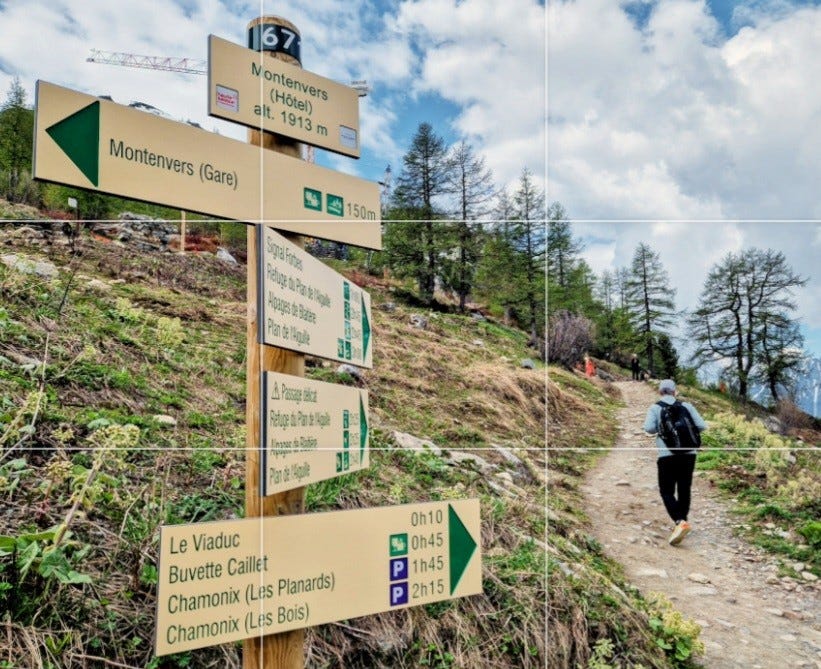
The Rule of Thirds is the most basic rule of composition. It addresses our human inclination for visual aesthetics.
🤓 Rule of Thirds Principle and How It Was Created
The Rule of Thirds is a fundamental principle of photographic composition used to create balanced and aesthetically pleasing images.
This rule imagines a grid superimposed over the image, dividing it into nine equal parts: three vertical and three horizontal sections.
The key principle is to align your photograph's subjects or key elements along these lines or at the points where they intersect.
The idea is that an off-center composition can be more pleasing to the eye and look more natural than one in which the subject is placed right in the middle of the frame.
For example, if you're taking a photo of a horizon, you might align it with the top or bottom grid line rather than placing it directly in the middle of the frame. Similarly, you might place the person's eyes at one of the intersection points for a portrait.
This is not a strict rule but more of a guideline that many photographers use to enhance their photos' balance and visual appeal. Creative deviations from the Rule of Thirds can also lead to striking compositions. It's all part of the creative process in photography.
The Rule of Thirds is derived from a broader concept known as the golden ratio, which has been used in visual composition for centuries.
The golden ratio is a mathematical ratio commonly found in nature and used in design for its aesthetic balance and appeal.
The layout of a photograph into a grid of nine equally-sized boxes and the placement of subjects along these lines or their intersections allows for a well-balanced composition.
In the 20th century, with the rise of photography, the Rule of Thirds was further emphasized as an elementary principle in photographic composition, taught to beginners and used by professionals for creating visually appealing images.
For now, practice the Rule of Thirds before we dive into the many forms of composition in future issues.
If you want to improve your photography skills instantly, do yourself a favor and practice the Rule of Thirds.
Basic Skill #2: Practice
Now that you know the Rule of Thirds and the magic it creates, let’s address the need to make every photo look perfect.
I was in Türkiye enjoying a gorgeous sunset at a peaceful rooftop lounge when an obnoxious couple plopped down in my direct line of sight.
The boyfriend, decked in Versace panache, snapped photos of his woman caked in fondant-like makeup and a red dollar store dress. Unfortunately, she continued to contort for a few more painful minutes until she started to bark about how the photos sucked. It got so loud that they were finally asked to leave.
This is not an extreme example of perfection paralysis - it happens a lot.
Perfection paralysis isn’t just about being paralyzed by the constant need to be perfect. It’s also the cause of being grossly inconsiderate and obnoxious.
I can bet that you’ve seen similar train wrecks during your travels. How’d it make you feel?
If you’ve been guilty of perfection paralysis, were you aware that you were doing it?
Photo storytelling is a choice between two buckets: fantasy and reality.
Within these two buckets are various levels of storytelling. One is not better than the other if you’re being transparent with your audience.
In Adventure Photography Chronicles, I will only share the reality bucket with non-edited (traditional photojournalism) and edited photos (we’ll review this in the next section)
🤓 What is Traditional Photojournalism?
Traditional photojournalism is a form of journalism where photos tell a news story.
It's a branch of journalism that's primarily about capturing compelling images that convey the essence of a story in a direct, powerful, and often dynamic way.
Traditional photojournalism adheres to a high ethical standard of truth and objectivity, seeking to present events as they actually occur without manipulation or embellishment, respecting the dignity and privacy of subjects, and striving to minimize harm while reporting.
While the medium has evolved, with digital photography largely replacing film-based photography, the principles of traditional photojournalism remain the same: telling stories through images, conveying the truth, and capturing decisive moments that inform, engage, and provoke thought in the viewer.
Phone cameras have made it so easy for us to capture almost any moment we want, and it’s a choice we make to share what we see as-is or altered.
Your phone camera is a mini-production team with many options and editing apps that allow you to experiment with more freedom and consistency than a camera.
Try practicing without asking anyone to pose for you. This forces you to learn how to move with your camera and to develop a sixth sense of good composition.
Don't spend time staging every shot, which all looks the same after a hundred photos.
Instead, move with the camera.
Take photos of details, movement, facial expressions, body language, and the environment.
Don't take postcard photos that you can buy at a souvenir shop.
It's ok to document but pay attention to the details that create a vibrant full story of your adventures and travels.
The only way to improve is with lots of practice, learning from mistakes, applying the lessons, rinse and repeat.
Basic Skill #3: Editing
You’ve made it to the last part, and as a reminder, drop a comment to let me know what more you’d like me to focus on.
Your feedback is essential so I can continue adding more value to each issue.
Now, for a quick recap:
Composition and the Rule of Thirds create pleasing aesthetics.
Perfection Paralysis numbs your ability to take action and destroys your ability to be in the moment without heavily altering reality.
After you’ve taken all the photos, should or shouldn’t you edit?
I mentioned in the previous section that traditional or pure photojournalism prohibits editing. Even cropping or framing the photos is a no-no. But outside this traditional realm, editing is allowed if you don’t cross into fantasy land. Here’s how:
DO fix the lighting for dark photos without changing the environment.
DON'T change the sky from day to night and vice versa.
DO adjust the richness of colors and details.
DON'T change the colors to different colors.
DO remove spots and small objects/people if they are distracting.
DON'T add/delete objects or people so that the reality is completely altered.
DO improve clarity and reduce noise (visual artifacts that make the photo look blotchy).
DON'T retouch photos so that everything looks fake and too good to be true.
DO crop for the Rule of Thirds.
DON'T overcrop so that the entire photo loses interesting details (sort of like overplucking your eyebrows 😅).
Phone apps for iPhone and Android are fantastic!
I’m a big fan of the Photoshop Lightroom mobile app, which is part of the Adobe ecosystem.
Adobe had used AI since before it became everyone's best friend (or enemy) during the past six months. The AI developments from these apps have taken years to develop and are way ahead of the curve of most apps. I mostly use the Photoshop Lightroom mobile app because it's part of my personal and professional work ecosystem.
Here is a before and after example using the mobile app to make subtle edits.


The advantage of editing directly on your phone is that you can immediately share to your social channels while retaining metadata, such as location. This helps me when I’ve taken shots on both my phone and camera and need to reference information on the fly quickly.
Use your phone camera and enjoy the freedom it gives you without the clumsiness of a camera.
And stop overthinking it.
Once you’ve got the hang of Composition and Editing without the Perfection Paralysis, we can move on to bolder steps.
Lots of learnings here! Congrats!
This is exactly what I'm looking for 🙂